Since someone asked on the forums today, I thought I'd put together a picture guide of how to edit the pictures on your Exchange custom content.
First off, you have to edit the pictures and custom content
before you upload it to the Exchange. Share it in game as you normally would, but don't upload it yet in the launcher.
You'll need to download the installer for the program called
Sims 3 UIC by Zinda.
http://www.zindasgoldensims.com/
Open the Sims 3 UIC program. Then click the
Open button in the top-right. Navigate to your Sims 3 Exports folder (usually
C:\My Documents\Electronic Arts\The Sims 3\Exports), and select your custom content.
The number on the bottom-right is important, as it shows you how many pictures you can change, and how many photos you'll want to take (although you don't have to change them all if you don't want to).
Side-note: if you want a custom avatar on the Sims 3 site, the
very first image (Image 1 of 7) is the one that will be available for use on the Exchange since it's the default portrait photo.
Now you'll need to take some photos in game that you want to use with your custom content. Take a screenshot in-game using the default key, C, or you can also use your favorite screenshot program (such as FRAPS).
Keep in mind while picking the focus of your screenshots that the images used in the program are a perfect square, so when you crop your picture down in the later steps, you will end up cutting off the left/right, or both sides of your screenshot. So make sure you can fit everything nicely into a square before taking a picture!
 |
| As an example, I have a normal screenshot above, but when I want to use it in UIC later, I'll end up cutting out everything outside the red box that I drew. Imagine trying to fit everything nicely into a square before taking a picture! |
By default, if you're using the in-game screenshots, they should save to your Documents folder, something along the lines of:
C:\My Documents\Electronic Arts\The Sims 3\Screenshots
Once you have the mininum number of pictures (and maybe some extras in case your first set don't turn out as well as you hoped), you'll need to edit them in an image editing program. Even Microsoft Paint or Image Viewer should be fine, if you have nothing else. Use the Crop and Resize tool and crop your picture down to a square as best as you can, and keep the size at or above 512x512 pixels.
Do that with all the photos that you need to (you can even add text or other effects to your pictures if you'd like to), and then go back to Sims UIC and
Replace them with the button on the far-right side, using the
Prev and
Next buttons on the left size to switch between pictures on the custom content.
The picture being square or mostly square is what's most important, as the Sim UIC program will try to squish your photo down to the size and proportions automatically. If you just tried to import the original photo as it were, it would look very distorted.
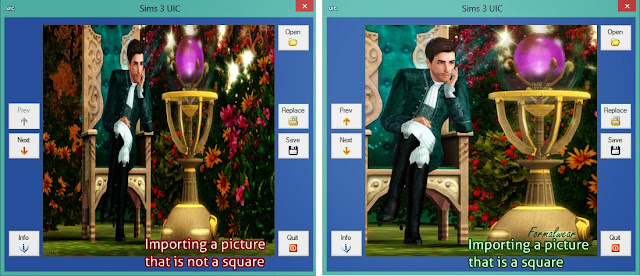 |
The left picture is incorrect, as it was not sized down beforehand.
The right picture was correctly made into a square before importing it. |
Once you've finished replacing all of your pictures and are satisfied, be sure to hit the
Save button.
Now go back to the Sims 3 launcher and upload it as you normally would. Check out your new content on the Exchange, and you should see your creation with the custom photos you added to it!

You can use this method for everything you upload to the Exchange - and if you do it with a Sim, you can change your forum avatar to have the same picture - again, it can only use the
first custom photo.
 |
| Select the pencil icon by your portrait, change the category to Uploaded Avatars, then pick from a Sim you've uploaded. The #1 picture you changed in the UIC program will be the photo you can use for your forum avatar! |


